
@aaronkaganSubmitted 2 months ago
Latest solutions
Results Summary Component using Svelte and TailwindCSS
#svelte#tailwind-cssPSubmitted 11 days agoI would appreciate feedback on:
- Component structure: Is my component breakdown logical and reusable? Should I have split any components further or combined any?
- TypeScript implementation: I'm not sure if my approach to typing the category styles is the most efficient. Is there a better way to handle dynamic object keys with TypeScript?
- CSS organization: I used Tailwind classes directly in the components. Would it be better to extract some common styles into separate CSS files or use Tailwind's @apply directive?
- Performance optimization: Are there any performance improvements I could make, especially regarding how I'm processing and transforming the data?
- Accessibility: I tried to make the component accessible, but I'd appreciate a review of my semantic HTML structure and ARIA attributes to ensure I'm following best practices.
- Animation: I'd like to add subtle animations when the component loads or when hovering over items. Any suggestions on how to implement this effectively in Svelte?
Frontend Quiz App using TailwindCSS
#tailwind-cssPSubmitted 14 days agoI would love feedback on the following areas:
- Timer Implementation in Quiz App
The timer functionality in my quiz app has been challenging to implement correctly. Here's the relevant code from my timer.js file:
import {elements, quizElements} from "./elements.js";

export const setTimesUpEvent = () => {
  // This function is called when the quiz is rendered
  // I need help ensuring this properly handles the timer animation
  // and correctly triggers when time runs out
}
I'm particularly concerned about:
-
How to properly sync the CSS animation with the JavaScript timer logic
-
Ensuring the timer resets correctly between questions
-
Handling edge cases when a user answers just as time runs out
- Quiz Selection and Rendering Logic
I'm also looking for feedback on my quiz selection and rendering approach:
export const handleQuizSelection = (event) => {
  const button = event.target.closest(".menu__button");
  if (!button) return;

  state.currentQuiz = button.textContent.trim();
  updateHeader();

  const selectedQuiz = quizTypes[state.currentQuiz.toLowerCase()];
  const quiz = selectedQuiz
    ? selectedQuiz(getQuizData(state.currentQuiz))
    : null;

  quiz ? renderQuiz(quiz) : restoreMainMenu();
};
Is this approach maintainable for adding new quiz types in the future? Should I be using a different pattern for handling the quiz selection and creation?
-
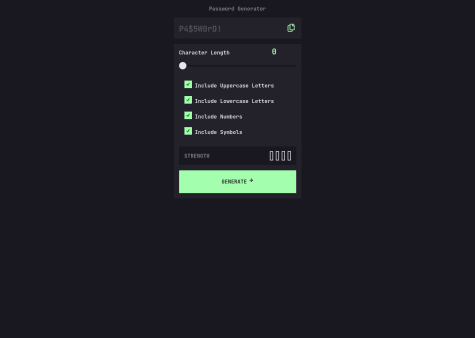
Password Generator App with custom notification funcionality
#bemPSubmitted 25 days agoI would love feedback on the following areas:
Password Generation Algorithm:
The current implementation is basic and could be enhanced. How can I make it more secure and ensure better distribution of character types? Here's the current generation function:
export const generatePassword = () => {
  const charset = [
    "ABCDEFGHIJKLMNOPQRSTUVWXYZ",
    "abcdefghijklmnopqrstuvwxyz",
    "0123456789",
    "!@#$%^&*()_+-=[]{}|;:,.<>?/"
  ];

  const selectedCharsets = strengths
    .map((input, index) => input.checked ? charset[index] : '')
    .filter(set => set !== '')
    .join('');

  let password = "";
  for (let i = 0; i < lengthValue; i++) {
    const randomIndex = Math.floor(Math.random() * selectedCharsets.length);
    password += selectedCharsets.charAt(randomIndex);
  }
  return password;
};
Should I implement a more sophisticated algorithm that ensures at least one character from each selected type is included?
Accessibility Implementation:
While I've included ARIA attributes and screen reader support, I'm particularly interested in feedback on the strength indicator implementation:
<div class="strength" role="region" aria-label="Password strength indicator"> <p class="strength__label">Strength</p> <div class="strength__meter"> <p class="strength__value" id="strengthValue" aria-live="polite"></p> <div class="strength__indicator" id="strengthIndicator" role="progressbar" aria-label="Password strength bars"> <div class="strength__bar"></div> <div class="strength__bar"></div> <div class="strength__bar"></div> <div class="strength__bar"></div> </div> </div> </div>Tip Calculator App using modular javascript and BEM
#bemPSubmitted about 1 month ago- Is the current debounce timing (150ms) optimal for user experience?
- How could the BEM structure be improved further for better component isolation?
- Could the validation system be more robust while maintaining its simplicity?
Time Tracking Dashboard Solution with async functions
PSubmitted about 1 month agoI would love feedback on the following areas:
- Error Handling in Fetch:
Currently, if the JSON file fails to load, the user doesn't get any feedback. How can I improve this? Should I add a loading spinner or a retry button? Here's the current fetch function:
const fetchDataAndUpdate = async () => { try { const response = await fetch("data.json"); const data = await response.json(); populateDOM(data); } catch (error) { console.error("Error fetching data:", error); } };- CSS Grid Layout:
I used CSS Grid for the main layout, but I'm not entirely sure if it's optimized. Specifically, I'd like feedback on this part of the CSS:
main {
  display: grid;
  gap: 1.5rem;
  grid-template-columns: repeat(auto-fit, minmax(300px, 1fr));
}
Is there a better way to handle the grid for different screen sizes?
- Accessibility:
I tried to make the dashboard accessible by using semantic HTML and ARIA labels, but I'm not sure if it's enough. For example, is this button accessible enough?
<button class="button-edit">
  <svg>...</svg>
  <span class="sr-only">Timer Settings</span>
</button>
Should I add more ARIA attributes or improve the focus states?
Newsletter Sign-up page using Javascript for email validation
PSubmitted about 2 months ago< EN >Any help and feedback are very welcome! ^-^
< PT >Toda ajuda e feedback são muito bem-vindos!!! ^-^
Latest comments
- P@CrtykwodPosted 11 days ago
Congrats completing the challenge, the code looks very concise and well made!
However, I think you forgot to apply the gradient when the continue button is on:hoverstate.0 - @jenna1kSubmitted about 1 year agoP@CrtykwodPosted 14 days ago
Congratulations for you great job!
I don't understand next.js syntax so well, so I cant give you a decent feedback, sorry, but the project is very well made!
0 - P@leonardoalmeida7Submitted 21 days agoP@CrtykwodPosted 16 days ago
Opa Leonardo, beleza? O projeto ficou ótimo, parabéns!!
Ainda assim existem algumas coisinhas que podem melhorar. Por exemplo, no github, você upou todos os arquivos, até o README.md que pede explicitamente para ser apagado sksksk:
Once you've added your information to the template, delete this file and rename the README-template.md file to README.md. That will make it show up as your repository's README file.
Você pode simplesmente excluir esses arquivos, não polua seu repositório com um monte de arquivos inúteis, isso vai acabar te complicando caso você queria voltar algum dia para esse projetos. Ah, também é um ótima ideia adicionar o seu .gitignore ao .gitignore.Agora falando do código:
Fiz um pull request no seu git com todas as mudanças, pois achei bem interessante que você não utilizou
<input type:range>para o slider, não sei se você não sabia sobre ele, mas evitaria um estresse.- Melhorias no Slider
O slider passou por melhorias significativas:
- Cálculo da posição: Agora, a largura do "thumb" (bolinha do slider) é considerada ao calcular a posição, evitando que ultrapasse os limites do contêiner.
- Uso de
transform: translateX: Utilizartransformao invés deleftresulta em um movimento mais suave e eficiente do slider. - Introdução de
maxValue: A adição de um valor máximo controlado no slider garante uma experiência mais precisa e evita números mágicos.
Essas mudanças tornam a interação com o slider mais fluida e previsível.
- Lógica do
updateStrengthIndicatorNa versão inicial da função
updateStrengthIndicator, a lógica estava utilizando uma série de condiçõesif/elsepara calcular a força da senha, o que tornava o código muito verboso e difícil de manter. O fluxo de verificação da força da senha era repetitivo e com muitos pontos de decisão, o que gerava redundância e aumentava a complexidade.Mudanças feitas:
-
Eliminação de
if/elserepetitivos: A estrutura original usava váriosif/elsepara verificar diferentes condições de comprimento de senha e caracteres selecionados. Isso resultava em um código longo e difícil de entender. Eu substituí essa estrutura por uma lógica mais simples que usaArray.from()efind()para determinar de forma concisa o nível de força da senha. -
Uso de
Array.from()efind(): Ao invés de usar várias verificações comif, agora a lógica usa o métodofind()para localizar o primeiro limiar de comprimento de senha que se aplica. Esse método percorre os limiares e encontra o primeiro valor em que o comprimento da senha se encaixa, tornando a busca mais eficiente e legível. -
Redução do código: A implementação ficou mais compacta e legível, removendo a necessidade de múltiplas verificações manuais. Usando o
find(), o código agora realiza a busca do limiar de forma mais direta, sem precisar de múltiplas comparaçõesif.
- Modularização da lógica de geração de senha
Uma das principais mudanças foi a modularização da lógica de geração de senha, o que tornou o código mais organizado e reutilizável. Antes, a lógica de geração de senha estava toda concentrada dentro da função
generatePassword(), o que tornava o código difícil de entender e manter, além de ser menos flexível.Mudanças feitas:
-
Funções auxiliares: A lógica foi dividida em várias funções menores e específicas, como
getSelectedCharacters(),createPassword(), edisplayPassword(). Cada função tem uma responsabilidade única, o que facilita a compreensão do código e sua manutenção no futuro.getSelectedCharacters(): Agora é responsável apenas por retornar os caracteres selecionados com base nas caixas de seleção, sem se preocupar com a geração ou exibição da senha.createPassword(): Esta função agora é responsável exclusivamente por gerar a senha aleatória, com base no comprimento e no conjunto de caracteres fornecido.displayPassword(): Esta função é encarregada de exibir a senha gerada na interface, mantendo a lógica de exibição separada da lógica de geração.
-
Vantagens da modularização:
- Legibilidade: O código ficou muito mais claro. Agora, cada parte do código tem uma função bem definida e não há sobrecarga de responsabilidade em uma única função.
- Reutilização: Funções como
createPassword()egetSelectedCharacters()podem ser reutilizadas em outras partes do código ou até em outros projetos, sem a necessidade de duplicação de código. - Facilidade de manutenção: Como a lógica foi dividida em partes menores, qualquer alteração futura no processo de geração de senha, por exemplo, pode ser feita de forma isolada, sem afetar outras partes do código.
Por fim:
de - Lógica do
updateStrengthIndicatoré tudo gerado pelo gpt, fiquei com baita preguiça de escrever, já são 02:00, então caso suja qualquer dúvida, pode me chamar no Discord: crty.Caso você queira tentar fazer essas mudanças por si só, rejeito o PR e bom trabalho, o código inicial estava ótimo, essas são apenas algumas pequenas mudanças que propiciam um código mais limpo e mais legível.
Good coding! \o/
Marked as helpful0 - P@Buch-devSubmitted 23 days agoP@CrtykwodPosted 23 days ago
I like how this password is considered very weak:
==*&?ß=?ß$*()/)=?ß()*%)$#/=)#§*?=#?(ß*%$§ß$#)(%&)(ß??%?§§?$)§/$$/###$$#ߧ(&$ß%#(§=?(?/ß$)/&)*=1 - @EleniyancodeSubmitted 24 days agoWhat are you most proud of, and what would you do differently next time?
my html struture
What challenges did you encounter, and how did you overcome them?responsiveness of the page
What specific areas of your project would you like help with?responsiveness of the page
P@CrtykwodPosted 24 days agoHello, @Eleniyancode! Congratulations on completing the challenge! The HTML is well structured, but you shouldn't have more than one
<h1>in your code.Now, about the responsiveness of the page, it's good, but it could be better, media-queries are very limiting and you can almost always replace them with other resources, so, in your main, I would keep the grid as it is, but increase the width, and set it to
max-width: 30rem, so the layout remains adequate even on slightly larger screens.
As for@media (min-width: 40rem), I recommend you do it this way:@media (min-width: 40rem) { max-width: 60rem; grid-template-rows: 1fr; grid-template-columns: repeat(auto-fit, minmax(200px, 1fr)); }This completely removes the need for
@media (min-width: 60rem)and allows for a more responsive and dynamic design based on the device's screen size.Marked as helpful1 - @saram7619Submitted about 2 years agoP@CrtykwodPosted 25 days ago
well done, the code is very well-structured!
(another 2 years old solution i have to peer review :v)
0