
Submitted over 1 year ago
Interactive card details form using React
#materialize-css#solid-js#react

@TheRedBandiCoot

Design comparison
SolutionDesign
Solution retrospective
Frontend Mentor - Interactive card details form solution
This is a solution to the Interactive card details form challenge on Frontend Mentor. Frontend Mentor challenges help you improve your coding skills by building realistic projects.
Table of contents
- Installation Guide
- Overview
- The challenge
- Screenshot
- Links
- My process
- Built with
- What I learned
- Useful resources
- Author
Installation Guide
- Clone the repository in your local IDE using this code in your terminal :
git clone https://github.com/TheRedBandiCoot/Interactive-card-details-form.git
- After successfully get the files in your local IDE go to the new directory Interactive-card-details-form
cd Interactive-card-details-form
- Now run this code for install dependencies and running the app at the same time.
npm install && npm run dev- In case if you got some error for installation or run it, you can run
npm installandnpm run devseparately
- Now click the link which is provided in your terminal or you can write the url manually in your browser
- LocalHost-(url)
- You can also press
oin your in the terminal for open the url automatically in your browser.
-
Press
ctrl + corqin your terminal to close the server. -
You can also change the server port configuration
- Open
vite-config.js - Right after the plugin, add another obj called
server - Create a property called
portin your server & add value for your port.
Here is the code
// https://vitejs.dev/config/
export default defineConfig({
plugins: [react()],
server: {
port: 5000,
},
});
- Make sure to restart the server by pressing
rin your terminal for new changes.
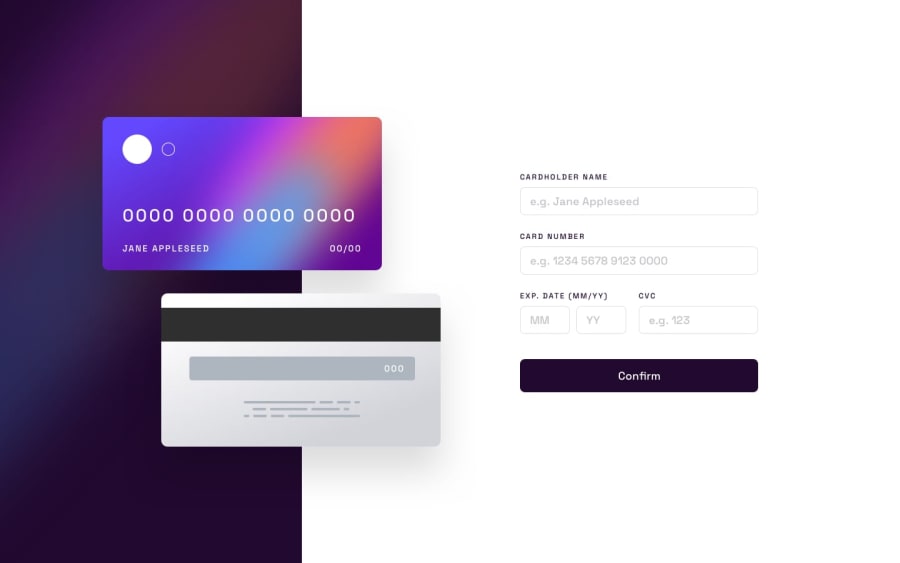
Overview
The challenge
Users should be able to:
- Fill in the form and see the card details update in real-time
- Receive error messages when the form is submitted if:
- Any input field is empty
- The card number, expiry date, or CVC fields are in the wrong format
- View the optimal layout depending on their device's screen size
- See hover, active, and focus states for interactive elements on the page
Screenshot
Links
- Solution URL: check here🔗
- Live Site URL: check here🔗
My process
Built with
- Semantic HTML5 markup
- CSS custom properties
- Flexbox
- Mobile-first workflow
- React - JS library
- vite
- Vite.js is a development tool that comes with a dev server and is used for modern web applications.
- It offers a faster and smoother workflow in terms of development.
What I learned
- Tried to create a input box for credit card entering feature. How hard that can be if you know
regex(honestly it took some minutes withregex) but with normal JS to create that feature you have to put way more logic than you thought. Yes there so manyreact provided libraryalso there to help you out for solving the issue. - Using
“min”“max”in Input box in html. - Use the
onFocusandonBlurevents in React to handle focus and blur events on elements. - Also learned that these events are equivalent to the native
focusinandfocusoutevents, but they are normalized to bubble in React. - A
ternary operatorinside the style prop of an element to conditionally apply inline styles. - Learned that an
empty object in the style prop means no inline styles are applied to the element. - How to style the
placeholder text in an input box using CSS. - Learned that I can use the
::placeholderpseudo-element selector to apply different styles to the placeholder text than the input text. - Also learned how to create a floating label effect for my input box, where the placeholder text moves above the input field on focus.
- How to use an input box followed by a label element, and use the
adjacent element selector (+)to style the label based on the input state. - Responsiveness design.
Useful resources
- Regular expressions - JavaScript | MDN
- HTML input min-max Attribute
- React hook - onFocus and onBlur
- Bing AI ChatBot
- Custom-Hooks
- React-Spring
- React 18 Tutorials By Codding Addict
Author
- Github - TheRedBandiCoot
- Frontend Mentor - @TheRedBandiCoot
- Twitter - @subho19996
Community feedback
Please log in to post a comment
Log in with GitHubJoin our Discord community
Join thousands of Frontend Mentor community members taking the challenges, sharing resources, helping each other, and chatting about all things front-end!
Join our Discord