


Design comparison
Solution retrospective
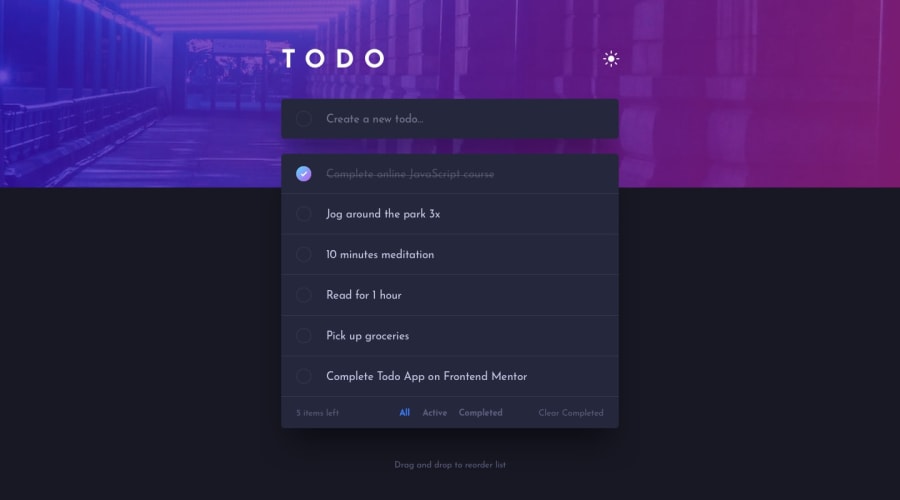
FIXED AND DONE
Hi everyone!
I spent so many hours on this and I can't progress any further. Probably it's just a lack of knowledge or I don't understand some JS behaviours 😢
I designed it pretty fast, I have no problems with HTML and CSS, it's like breathing. Even if I don't know something I can google it easily. I made up my own idea of segregating and styling dark/light theme. Check it out and let me know if it is a proper way.
Then I programmed appearing text from Input on the list. Easy.
But when I tried to code delete buttons, my nightmare has started. I red, watched and tried 'normal' methods, array methods... Finally after 3hours I just coppied code from my previous 'Todo', which I was doing with one of the courses I watched. I tried to understand what I've just coppied, but Objects and Arrays are some black magic to me. I understand how to write them and which one is which, but I just can't use them by myself to code anything. I imagine that coding Completed, Active and All sections requires using 3 arrays, if I'm right... but how?
I wish I could learn this OOP in JS. But I can't find tutorials or courses that could explain to me in a way I can understand and remember...
This is my first solution in Intermediate level, but I can see now that it was too early for me 😢
If you have any sources of knowledge or some lessons I will appreciate your effort!
Thank you! ❤
EDIT #1:
I fixed markAsCompleted function and now it adds class to each checked todo. I also implemented Clear Completed button logic, where it checks if todo-list has class named 'completed' and if it has, it should splice that todo from an array and render list without that todos. But... Check it out what is happening. I have no clue. I'm not even sure if renderTodoList() is appropiate function.
Community feedback
- @JAleXDesigNPosted over 1 year ago
Hi @BBualdo, this is one way you can achieve the functionality of the todo list:
- In the text input section add an id to the checkbox and to the input:
<section class="todo-input-container"> <div class="todo-input"> <input id="add-task" class="checkbox" type="checkbox" /> <input id="input-add-task" class="todo" placeholder="Create a new todo..." /> </div> </section>- The "todo-list-container" section can be left empty, since the tasks will be added with js:
<section class="todo-list-container"> <!--Tasks will be added with js--> </section>- In the "nav-bar-container" section you can do the following:
- Add an id to the p element inside the "items-left", to be able to dynamically change its text according to the number of tasks.
- Add the class "is-toggled" all button "All", since it will be selected by default.
<section class="nav-bar-container">
  <div class="items-left">
    <p id="items-count"><!--items left--></p>
  </div>
  <div class="categories">
    <button class="category-button is-toggled">All</button>
    <button class="category-button">Active</button>
    <button class="category-button">Completed</button>
  </div>
  <div class="clear-completed">
    <button class="clear-completed-button">Clear Completed</button>
  </div>
</section>
Now we go with the Javascript code:
// Elements const todoListContainer = document.querySelector(".todo-list-container"); const checkToAddTask = document.getElementById("add-task"); const inputAddTask = document.getElementById("input-add-task"); const categoryButtons = document.querySelectorAll(".category-button"); const buttonClear = document.querySelector(".clear-completed-button"); const itemsCountElement = document.getElementById("items-count");- The task array can be updated as follows by adding the id and complete properties which will be false by default:
let todoList = [ { id: 1, name: "Complete online JavaScript course", completed: false }, { id: 2, name: "Jog around the park 3x", completed: false }, { id: 3, name: "10 minutes meditation", completed: false }, { id: 4, name: "Read for 1 hour", completed: false }, { id: 5, name: "Pick up groceries", completed: false }, { id: 6, name: "Complete Todo App on Frontend Mentor", completed: false }, ];-
Create a variable to store the selected filter by default it will be "all":
let currentFilter = "all"; -
Add a function to render the list in the html:
- This function receives a parameter called list that if passed this is used, otherwise the list todoList will be used.
- In the variable html add the class "completed" to the container if
task.completedis true using a ternarytask.completed ? "completed" : "", also add adata-task-id="${task.id}"attribute, this will be used later for the update and delete actions and finally to the input the property checked is added if task.completed is true${task.completed ? "checked" : ""}.
function renderTodoList(list) { const filteredList = list || todoList; // 1 todoListContainer.innerHTML = ""; filteredList.forEach((task) => { const html = ` <div class="todo-list ${ task.completed ? "completed" : "" }" data-task-id="${task.id}"> <input name="completed" class="checkbox" type="checkbox" ${ task.completed ? "checked" : "" }> <div class="todo-content"> <p>${task.name}</p> <button class="delete-button">Delete</button> </div> </div> `; //2 todoListContainer.innerHTML += html; //Insert the html }); updateItemsLeftCounter(filteredList); // Update counter }- Now the functions to add, update, delete and filter:
- Add task: Create an object with the data of the new task, as id in this case numbers are being used in order and to continue we use the todoList.length to obtain the number of elements of the tasks array and we add 1:
id: todoList.length + 1, the name will be the value of the parameter name, and completed will be false, you add the new task to the array usingtodoList.push(newTask), render the list, reset the value of the input and finally the setTimeout is to uncheck the input a moment after the task is added
function addTask(name) { const newTask = { id: todoList.length + 1, name, completed: false, }; todoList.push(newTask); renderTodoList(); inputAddTask.value = ""; setTimeout(() => { checkToAddTask.checked = false; }, 200); }- Filter Task Function: This function receives the filter parameter and will be in charge of keeping the task lists updated in their respective category filters, first we create a copy of the tasks so as not to change the original array and avoid deleting certain tasks when switch categories, then use
tasksCopy.filterto filter the categories: iffilter === "all"return all tasks else if: filter === "completed" ? task.completedreturns the tasks wheretask.completedequals true otherwise those withtask.completedequal false, then stores the filter in the currentFilter variable and calls therenderTodoList(taskFiltered)function passing the filtered tasks as parameters.
function filterTask(filter) { const tasksCopy = [...todoList]; const taskFiltered = tasksCopy.filter((task) => filter === "all" ? task : filter === "completed" ? task.completed : !task.completed ); currentFilter = filter; renderTodoList(taskFiltered); }- Update task: This function receives the id of the task to update and to update the status of completed to said task we map the todoList, what this code does is that if the task.id is equal to the taskId passed as a parameter to the function
task.id === taskIdreturns a copy of the task and updates the property completed? { ...task, completed: !task.completed }this...taskis known as "spread operator" if you want to dig further into the topic, in thecompleted: ! task.completed, doing this!task.completedmeans it will change to the opposite if it was true the new value will be false and vice versa. Finally we call the function filterTask(currentFilter) passing the variable currentFilter as a parameter
function updateTask(taskId) { todoList = todoList.map((task) => task.id === taskId ? { ...task, completed: !task.completed } : task ); filterTask(currentFilter); }- Delete and Clear completed: Both functions use the filter method, in the deleteTask function the filter method returns the tasks whose id is different from the id of the task to delete
task.id !== taskId, and in the clearCompletedTasks function it returns the tasks whose value is completed is false
function deleteTask(taskId) { todoList = todoList.filter((task) => task.id !== taskId); filterTask(currentFilter); } function clearCompletedTasks() { todoList = todoList.filter((task) => !task.completed); filterTask(currentFilter); }- Update Items Left: It is in charge of updating the number of elements in each category, the variable label is created, the result of which will be: if label is equal to "all" it returns "left", otherwise the name of the filter, then it is dynamically updates the quantity: Resulting in: eg: 5 items left, 2 items active, 3 items completed... this according to the selected category
function updateItemsLeftCounter(list) {
  const remainingItemCount = list.filter((task) => !task.completed).length;
  const label = currentFilter === "all" ? "left" : currentFilter;

  itemsCountElement.textContent = `${remainingItemCount} items ${label}`;
}
At the events listeners will have:
checkToAddTask.addEventListener("click", (e) => { const name = inputAddTask.value.trim(); //Value of the input without spaces if (name === "") { //If name is an empty string, we prevent the input from being checked e.preventDefault(); } else { //Otherwise add the new task addTask(name); } }); inputAddTask.addEventListener("keydown", (e) => { const name = inputAddTask.value.trim(); if (e.key === "Enter" && name !== "") { // In the input if key Enter is pressed and name is not equal to an empty string add the new task checkToAddTask.checked = true; addTask(name); } });-
The clear button listener:
buttonClear.addEventListener("click", clearCompletedTasks); -
For the event listener of task kill buttons instead of selecting all buttons with "querySelectorAll" and using forEach, you can listen for the click event on the task container, for example:
- Here, event.target refers to the element that was clicked. .closest(".delete-button") finds the closest ancestor (parent) that has the class delete-button. This allows you to determine if the delete button was clicked, regardless of whether the click happened directly on the button or on an element internal to the button, the same goes for toggleCompleted.
- If deleteButton exists then we get the taskId which is passed as
data-task-id="${task.id}"attribute to the task container in the renderTodoList function, thedeleteButton.closest(".todo-list")part will access the parent element having the class "todo-list" and.dataset.taskIdwill get thedata-task-idattribute and will calls the deleteTask function using the retrieved id as parameter.
todoListContainer.addEventListener("click", (event) => {
  // 1
  const deleteButton = event.target.closest(".delete-button");
  const toggleCompleted = event.target.closest(".checkbox");

  if (deleteButton) {
    // 2
    const taskId = parseInt(deleteButton.closest(".todo-list").dataset.taskId);
    deleteTask(taskId);
  }

  if (toggleCompleted) {
    const taskId = parseInt(
      toggleCompleted.closest(".todo-list").dataset.taskId
    );
    updateTask(taskId);
  }
});
And finally, the category filter function
categoryButtons.forEach((button) =>
  button.addEventListener("click", () => {
    //Find an element with the class "is-toggled"
    const toggled = document.querySelector(".is-toggled");

    // If there is, remove the class is toggled
    if (toggled) toggled.classList.remove("is-toggled");

    // And add it to the button pressed
    button.classList.add("is-toggled");

    // Get the name of the filter, remove the trailing spaces and change to lowercase
    const filter = button.textContent.trim().toLowerCase();

    // Call the filterTask function with the name of the filter
    filterTask(filter);
  })
);
In the CSS in the todo-list-container class you are defining a height of 390px, this will mean that when adding new tasks they will not be displayed since the height is fixed (always 390px), you can solve it by changing height by min-height this way it will be at least 390px and the container will be able to increase in size as you add new tasks, You can also add a background-color to the container since when deleting the tasks its background is transparent.
.todo-list-container {
  background-color: var(--color)
  min-height: 390px;
}
Here are some resources related to the code:
- Ternary operators
- JavaScript Ternary Operator
- JavaScript Spread Operator
- What is the spread operator in JavaScript?
Maybe the feedback is too long: D, but I hope it helps you and that it has helped you learn something new. Good luck!.
Marked as helpful1@BBualdoPosted over 1 year ago@JAleXDesigN Hi! This is amazing ✨ I'm learning required things right now to give it another approach soon and try to code it by myself, but If I will fail (or success) I will review your feedback and compare it to mine 😀 I will reply again after, but for now I give you 'Helpful mark' and upvote just for effort and time you spent to write all of this and review my code ❤ But I'm sure it will be helpful! Thank you!
1@JAleXDesigNPosted over 1 year agoHello, at the moment I see that you are using the local storage to save the tasks, but, you are not getting them at startup, in that case you can do something like:
let todoList = [
  {name: 'Complete online JavaScript course'},
  {name: 'Jog around the park 3x'},
  {name: '10 minutes meditation'},
  {name: 'Read for 1 hour'},
  {name: 'Pick up groceries'},
  {name: 'Complete Todo App on Frontend Mentor'}
];

// Load todoList from local storage if available
const storedTodoList = localStorage.getItem('todoList');
if (storedTodoList) {
  todoList = JSON.parse(storedTodoList);
}
In that case you start the todoList array with the default tasks, then get the todoList item from local storage:
const storedTodoList = localStorage.getItem('todoList');and if there is, update the todoList array with the obtained from localStorage.In the addTodo function, consider adding a validation so that it does not allow adding empty tasks:
function addTodo() {
  const inputElement = document.querySelector(".todo");
  const name = inputElement.value;
  if (name.trim() !== '') {
    todoList.push({ name });
    todoInput.value = '';
    renderTodoList();
    saveTodoList();
  }
}
Another recommendation would be to define the element selectors at the beginning of your code so that every time you call a function that uses that element, you will be accessing the same element using the previously stored reference, and a new DOM lookup will not be performed to select the element.
1@BBualdoPosted over 1 year ago@JAleXDesigN That is not the case. I commented out getting todos from localstorage to match the design on screenshot. The case is in the todoList.splice(index, 1) inside of forEach() loop. Just try to mark some todos as completed and click Clear Completed button. I understand why it behaves like this. It's because it is splicing array live. So after splicing one element, the next one has index of 0 instead of staying on index 1 and so on... How to fix that? I'm struggling 2nd day on it.
0@JAleXDesigNPosted over 1 year ago@BBualdo. Ok, I get the point, the problem is that once you hit a delete button, when you re-render the list, there is no way to keep the "completed" status on the tasks, as there is no way to know that task had already been marked as "completed", a way to delete said task without losing the status would be:
  document.querySelectorAll(".delete-button").forEach((deleteButton, index) => {
    deleteButton.addEventListener("click", () => {
      todoList.splice(index, 1);
      deleteButton.closest(".todo-list").remove();
    });
  });
With this you are deleting only that task where the delete button is pressed, but this has its limitations since when using localStorage to save the tasks, it is more recommended that you add a status of completed in the todoList array something like:
  todoList = [
    {name: "", completed: false}
  ]
This will help you to know which tasks were marked as "completed" when rendering the list retrieved from localStorage
1@BBualdoPosted over 1 year ago@JAleXDesigN Delete buttons works fine 😀 I meant this part of code:
 // Clear Completed logic
  const clearButton = document.querySelector('.clear-completed-button');
  clearButton.addEventListener('click', () => {
    document.querySelectorAll('.todo-list')
      .forEach((todo, index) => {
        if (todo.classList.contains('completed')) {
          todoList.splice(index, 1);
          renderTodoList();
        };
      })
  })
It doesn't work like should.
0@JAleXDesigNPosted over 1 year agoHi, instead of using the slice method to remove the tasks from the array you can do the following:
- You start a new empty list.
- If todo does not have the complete class, save that task in the empty list
newTodoList.pushand access the task using the original array and the index generated in the forEachtodoList[index]. - Update the todoList array with the updated newTodoList array.
// Clear Completed logic
const clearButton = document.querySelector(".clear-completed-button");
clearButton.addEventListener("click", () => {
  let newTodoList = []; // 1

  document.querySelectorAll(".todo-list").forEach((todo, index) => {
    console.log(index);
    if (!todo.classList.contains("completed")) {
      newTodoList.push(todoList[index]); // 2
    }
  });

  todoList = newTodoList; // 3
  renderTodoList();
});
Regarding the code of the delete buttons, according to what I reviewed, there is an error and that is that although it deletes the task, those that were already completed are unchecked, that's why I said it in the previous comment, I don't know if you've solved it but I'm basing myself on the code from the repository.
Marked as helpful1@BBualdoPosted over 1 year ago@JAleXDesigN I’m trying to do everything the way you told me first and I’m proud of that I figured out {completed: false} on my own and now I see you advised that 😀 that is progress in my JS way of think!
1@JAleXDesigNPosted over 1 year ago@BBualdo Great! It's good that you're improving in that aspect, keep it up!
1@BBualdoPosted over 1 year ago@JAleXDesigN I've done it! I don't understand most of your feedback code, but I just need to learn using filter(), map() and others array's methods. But thank you! :D
1 - P@JIH7Posted over 1 year ago
Hey, this looks really awesome. It can be very frustrating when you can't get things working quite right, but the HTML and CSS are on point and you have a lot of the functionality there.
I think a great resource for learning arrays and OOP (and where I learned them) is the 100devs course by Leon Noel on YouTube. You can probably skip the early classes because your HTML and CSS skill are absolutely on point.
You mentioned not understanding how your delete button works, let's take a look at it. Your current solution is concise, well formatted, and would probably be the way to do it in production for a company, but lets do a refactor along the way to make it easier to understand.
document.querySelectorAll('.delete-button')
    .forEach((deleteButton, index) => {
      deleteButton.addEventListener('click', () => {
        todoList.splice(index, 1);
        renderTodoList();
    });
  });
You start by calling
document.querySelectorAll('.delete-button'). This goes through the document and finds ever item with the.delete-buttonclass and adds them to an array. For readability, lets store that array in a variable insteadconst deleteButtons = document.querySelectorAll('.delete-button'); deleteButtons .forEach((deleteButton, index) => { deleteButton.addEventListener('click', () => { todoList.splice(index, 1); renderTodoList(); }); });Then you call
array.forEach()method on the array..forEachis a "higher order function," meaning it takes another function as an argument, which you're currently doing with an arrow function. Let's abstract that out into it's own function to make it more readable for us.const deleteButtons = document.querySelectorAll('.delete-button'); deleteButtons.forEach((deleteButton, index) => addDeleteListeners(deleteButton, index)); function addDeleteListeners(deleteButton, index) { deleteButton.addEventListener('click', () => { todoList.splice(index, 1); renderTodoList(); }) }You do still have to use an arrow function to get the arguments but I think this makes things a little more readable for this.
.forEachwill loop through our array and perform a function on each item within it. In the arrow function of a.forEachthe first argument is always the item itself. You can name it whatever you want, in this case it'sdeleteButtonbut you could name itelement,el,e,zebra,fdsfjdsahfksldahetc. You can actually just have one argument if all you need is the item. So that would look likedeleteButtons.forEach((deleteButton) => addDeleteListeners(deleteButton,));We will, however, need the index as well. Since arrays are a numbered list of objects, index represents an item's position in the array. Indexes start at 0 so the first item's index will always be 0, not 1. We can actually access an individual item with the index using square brackets notation.const deleteButtons = document.querySelectorAll('.delete-button'); console.log(deleteButtons[0]); console.log(deleteButtons[1]); console.log(deleteButtons[2]);This will output each the first three buttons' HTML markup to the console. So index will be the second argument of
.forEach. We can technically name it whatever we want, but generally justindexoriis a good practice. Fun fact, you could add a third argument to this function, and that would be the array itself. Once again you can call it whatever you want. SodeleteButtons.forEach((deleteButton, index, array) => addDeleteListeners(deleteButton, index, array));We don't need to do that for this particular case however.So onto the main part of this function.
deleteButton.addEventListener('click', () => {
      todoList.splice(index, 1);
      renderTodoList();
    })
I won't explain event listeners as you already seem pretty comfortable with them, but note that since we are iterating over each element, it is adding an event listener to every object in the array.
Within the event listener you're using
array.splice()on your todoList array..spliceis a function that removes an item from the array at a specific index. This is where our reference to the index comes in handy! Since every item in the todoList array has a delete button,todoListanddeleteButtonswill always be the same length, and because.querySelectorAllreads from top to bottom, they will always be in the same order! So.spliceremoves things from the array at a specific index, for that we'll just user our handy dandyindexvalue. The second argument is how many items to remove. Of course for our purposes we only need to remove the item that is being deleted, so we just have that be 1. I hope this explanation helps!I bet you could totally get the clear all button working! You very similarly use a
.forEachwith an if statement inside the function. in a statement liketodoList.forEach((todo, index) => {//Your code here}), you can check iftodohas the.completedclass and splice it out if it does. Best of luck and keep up the awesome work!Marked as helpful1@BBualdoPosted over 1 year ago@JIH7 I understand how
.forEachfunction works 😀 But your in-depth explanation cleared it up for me even better! I also though that I could code 'Clear Completed' button, but I wanted to filter completed from active first and I had stuck. I'm gonna learn more, check out guides you mentioned and come back to this challenge! I didn't give up, just left it for now 😁 Best regards!1 - @BilsypPosted over 1 year ago
Hi there! If you want to deepen your understanding of objects and arrays, I highly recommend learning platforms like FreeCodeCamp. They provide clear tutorials and challenges to help you master these concepts. Hope this helps!
Source: FreeCodeCamp
Marked as helpful1@BBualdoPosted over 1 year ago@Bilsyp I just started, maybe it will clear some things 😀 Thanks for that!
0


Please log in to post a comment
Log in with GitHubJoin our Discord community
Join thousands of Frontend Mentor community members taking the challenges, sharing resources, helping each other, and chatting about all things front-end!
Join our Discord